
ABB Robot DSQC679 Teach Pendant Fault Repair: Troubleshooting Guide for Black Screen, Touch Failure, and Failure to Start
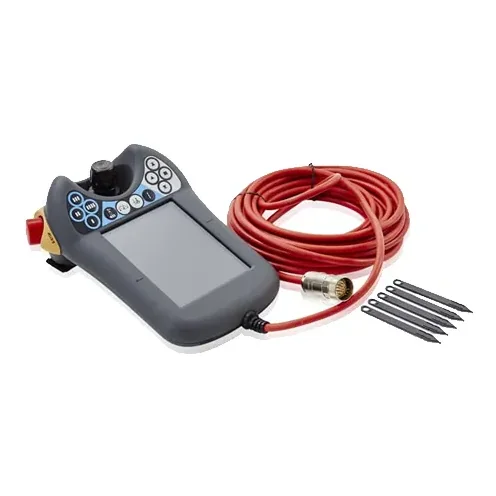
The ABB DSQC679 (common material number 3HAC028357-001) is the TPU3 teach pendant commonly used in IRC5 robot systems. Long-term frequent operation, accidental drops, cable pulling, or aging internal components may cause faults such as black screen, white screen, touch failure, unresponsive buttons, communication abnormalities, and failure to start. This article introduces the common faults of the DSQC679 teach pendant, judgment methods, repair procedures, and key points for post-repair inspection, helping on-site personnel quickly narrow down the fault scope.
In this article
ABB robot teach pendants are important devices for operators to edit programs, adjust points, perform manual operations, and query alarms. Due to their high frequency of use and often being in a mobile, suspended, or handheld state, they are susceptible to factors such as drops, collisions, oil contamination, dust, cable bending, and connector loosening.
The DSQC679 is commonly found in ABB IRC5 robot systems, often referred to as the TPU3 teach pendant, with the common material number 3HAC028357-001. Hardware versions and order numbers may vary between devices; refer to the original machine's nameplate information before repair or replacement.
1. Common Fault Manifestations of the DSQC679 Teach Pendant
When the DSQC679 malfunctions, common on-site phenomena include:
The screen does not light up at all after the teach pendant is powered on.
The screen backlight turns on, but there is no normal image.
White screen, garbled screen, flickering screen, or abnormal display appears after startup.
Horizontal lines, vertical lines, dark areas, or uneven brightness appear on the LCD screen.
Partial touch screen failure, touch point drift, or complete unresponsiveness.
Abnormal operation of physical buttons, enabling devices, or emergency stop buttons.
The teach pendant stays on the startup screen and cannot enter the operating system normally.
Frequent restarts, freezes, or communication interruptions during operation.
Intermittent power loss to the teach pendant when the connecting cable is bent to a specific position.
Cracked casing, touch panel, or LCD screen due to a drop.
These phenomena may originate from the LCD screen, touch panel, backlight circuit, mainboard, power circuit, communication lines, or connectors. "Black screen" or "failure to start" alone cannot directly confirm that a specific component is damaged.
2. How to Troubleshoot Black Screen or No Display
When a black screen appears on the DSQC679, first distinguish between "no power at all" and "powered but no display."
If the screen does not light up and there is no response from status indicators, priority should be given to checking:
Whether the control cabinet starts normally.
Whether the teach pendant cable is damaged, crushed, or excessively bent.
Whether the connectors at both ends of the cable are fully locked.
Whether the connector pins are bent, oxidized, or contaminated.
Whether the internal power input and power conversion circuit of the teach pendant are abnormal.
If the screen has a backlight but no image, the focus should be on checking:
The connection status of the LCD screen and its ribbon cable.
The display interface and related driver circuits.
The startup status of the mainboard.
Whether internal storage or system startup is abnormal.
Whether there is cold solder, corrosion, or component damage on the mainboard.
During on-site inspection, it is not advisable to repeatedly plug and unplug the teach pendant while powered on. Follow the shutdown and power-off procedures specified in the ABB equipment manual to avoid expanding interface or mainboard faults.
3. Judging White Screen, Garbled Screen, and Bright Line Faults
White screen, garbled screen, horizontal lines, or vertical lines are usually related to the LCD display assembly, ribbon cable, or display circuit.
【Entire Screen Appears White】
Focus of inspection: LCD screen power supply, ribbon cable, display signal, and mainboard.
Possible causes: Loose ribbon cable, poor interface contact, damaged LCD screen, or the mainboard not outputting the display signal normally.
【Screen Shows Garbled Display or Flickering】
Focus of inspection: Ribbon cable, connectors, and display driver circuit.
Possible causes: Unstable contact due to long-term vibration, damaged ribbon cable, power supply fluctuation, or abnormal mainboard display circuit.
【Fixed Horizontal or Vertical Lines Appear on Screen】
Focus of inspection: LCD screen itself and ribbon cable connection.
Possible causes: Internal circuit damage to the LCD panel, abnormal ribbon cable contact, or the screen being squeezed or impacted.
【Screen Partially Darkens or Has Uneven Brightness】
Focus of inspection: Backlight assembly, LCD screen, and power supply circuit.
Possible causes: Backlight aging, abnormal power supply, or damaged LCD panel.
If the teach pendant has been dropped or impacted, even if the external glass is not visibly cracked, the internal LCD screen, connecting ribbon cables, or mainboard solder joints may be damaged.
4. How to Judge Touch Screen Failure
Touch failure is one of the more common faults of the DSQC679 teach pendant, mainly manifested as unresponsive touch, touch point offset, partial area failure, or automatic jumping points.
【Entire Screen Cannot Be Touched】
Possible causes: Damaged touch panel, loose touch ribbon cable, abnormal touch control circuit, or the system not correctly recognizing the touch device.
【Only Part of the Area Cannot Be Touched】
Possible causes: Local circuit breakage in the touch panel, panel aging, or deformation under pressure.
【Click Position Does Not Match Actual Response Position】
Possible causes: Abnormal touch calibration, panel aging, uneven installation force, or touch control signal drift.
【Automatic Clicks or Irregular Jumping Appear on Screen】
Possible causes: Oil and moisture contamination, damaged touch panel, poor ribbon cable contact, or abnormal internal control circuit.
Before repair, first clean the screen surface and confirm that the protective film is not lifting or pressing on the touch area. If the fault persists, then check the touch ribbon cable, panel, and control circuit. After replacing the touch panel, also check touch accuracy and response in all areas.
5. Possible Causes of Failure to Start or Repeated Restarting
When the DSQC679 stays on the startup interface, cannot enter the system, or restarts repeatedly, check from three directions: power supply, cable, and internal mainboard.
Common causes include:
Unstable power supply provided by the control cabinet.
Intermittent contact inside the teach pendant cable.
Loose connectors or pin damage.
Abnormal internal power conversion circuit.
Aging components or cold solder on the mainboard.
Abnormal memory or system startup section.
Liquid, oil, or metal dust entering the interior.
Damage to mainboard solder joints, interfaces, or components due to a drop.
If the teach pendant suddenly loses power or recovers when the cable is moved, there is a high possibility of internal cable breakage. If it restarts repeatedly in different orientations, further check the input power, mainboard, and internal connections.
6. Teach Pendant Cable and Connector Inspection
Cables are a part easily overlooked in DSQC679 fault troubleshooting. A normal teach pendant body does not mean the entire device can communicate normally.
During inspection, focus on checking:
Whether the cable outer sheath is damaged or flattened.
Whether the areas near the teach pendant and control cabinet connectors are excessively bent.
Whether the cable has been subjected to long-term pulling or twisting.
Whether the connector locking mechanism is damaged.
Whether the pins are bent, retracted, or oxidized.
Whether intermittent power loss or communication interruption occurs when the cable is at a certain angle.
When testing cable continuity, use the correct interface definitions and testing methods to avoid damaging the control cabinet interface due to incorrect connection or short circuit. Operations involving disassembly and electrical measurement should be performed by personnel with repair experience.
7. DSQC679 Teach Pendant Repair Procedure
A proper repair procedure should not just replace the screen or touch panel but should confirm step by step based on fault phenomena.
Step 1: Record Device Information
Record the DSQC679 model, complete material number, hardware version, applicable control cabinet, and robot model, and take photos of the fault screen and nameplate.
Step 2: Perform Visual Inspection
Inspect the casing, screen, buttons, emergency stop button, enabling device, cable, and connectors to confirm the presence of drops, liquid ingress, burn marks, or mechanical damage.
Step 3: Confirm Power Supply and Communication
Test whether the input power supply is normal, check the status of connectors and cables, and rule out control cabinet interface or external cable issues.
Step 4: Check Display and Touch Sections
Based on phenomena such as black screen, white screen, garbled screen, or touch failure, check the LCD screen, backlight, ribbon cable, touch panel, and related control circuits respectively.
Step 5: Check the Mainboard
Clean and inspect the mainboard, focusing on the power supply area, interface area, solder joints, and components with abnormal heat.
Step 6: Post-Repair Whole Machine Testing
After completing the repair, perform power-on startup, display, touch, button, emergency stop, enabling, and communication tests. Do not use only the screen lighting up as the criterion for repair completion.
8. Functional Verification After Repair
After DSQC679 repair is completed, it is recommended to check the following functions item by item:
Whether the teach pendant can power on normally and enter the operation interface.
Whether the screen display is clear, without flickering, horizontal lines, or vertical lines.
Whether all areas of the touch screen respond accurately.
Whether the physical buttons are normal.
Whether the emergency stop button can correctly trigger and reset.
Whether all positions of the enabling device work normally.
Whether mode switching and manual operation are normal.
Whether alarm records, program interface, and parameter pages can open normally.
Whether power loss or communication abnormalities occur when the teach pendant cable is slightly moved.
Whether communication between the teach pendant and control cabinet is stable during low-speed manual robot operation.
If robot movement is involved during testing, confirm that the work area is unmanned and operate according to on-site safety regulations.
9. How to Reduce the Probability of DSQC679 Damage Again
During daily use, the following measures can be taken:
Return the teach pendant to its dedicated holder after use; do not place it on the robot, fixture, or floor.
Avoid the cable dragging on the ground, being pressed, or tangled for long periods.
Hold the connector when plugging/unplugging; do not pull the cable directly.
Keep the teach pendant surface clean to avoid oil and coolant entering the interior.
Do not use sharp objects to operate the touch screen.
Regularly inspect the emergency stop button, enabling device, cable, and connectors.
Promptly repair when screen flickering, poor contact, or intermittent restarting is noticed to avoid fault escalation.
10. Summary
When the ABB robot DSQC679 teach pendant experiences black screen, white screen, garbled screen, touch failure, or failure to start, troubleshoot in the order of "visual inspection—power supply check—cable and connector check—display and touch check—mainboard inspection—whole machine verification."
The same fault phenomenon may correspond to multiple damage locations. For example, a black screen may be caused by the LCD screen, or it may be related to the cable, power supply, or mainboard. Accurately recording the fault status and verifying the complete material number before repair helps shorten detection time and avoid incorrect part replacement.
Repair Consultation
If you need to repair an ABB robot DSQC679 teach pendant, please provide photos of the front and back of the teach pendant, the complete material number, controller model, fault phenomenon, and photos or videos after power-on, and contact a repair engineer for further judgment.
Industrial Robot Repair Hotline: +86 18122009539
Contact Repair Engineer: +86 18122009539
Need a part or repair assessment?
Share the robot model, part number, fault details and destination country with our team.
Contact our team ↗