
Yaskawa YRC1000 Robot JZRCR-APP01-1 Teach Pendant Fault Repair: Troubleshooting Keypad Membrane, Mode Switch, and Connection Cables
When the Yaskawa YRC1000 robot JZRCR-APP01-1 teach pendant experiences key unresponsiveness, inability to switch modes, no screen display, or communication interruption, the fault may originate from the keypad membrane, mode switch, connection cables, emergency stop circuit, or internal circuit boards. This article introduces judgment methods for different teach pendant fault phenomena, component inspection sequences, and functional verification procedures after repair.
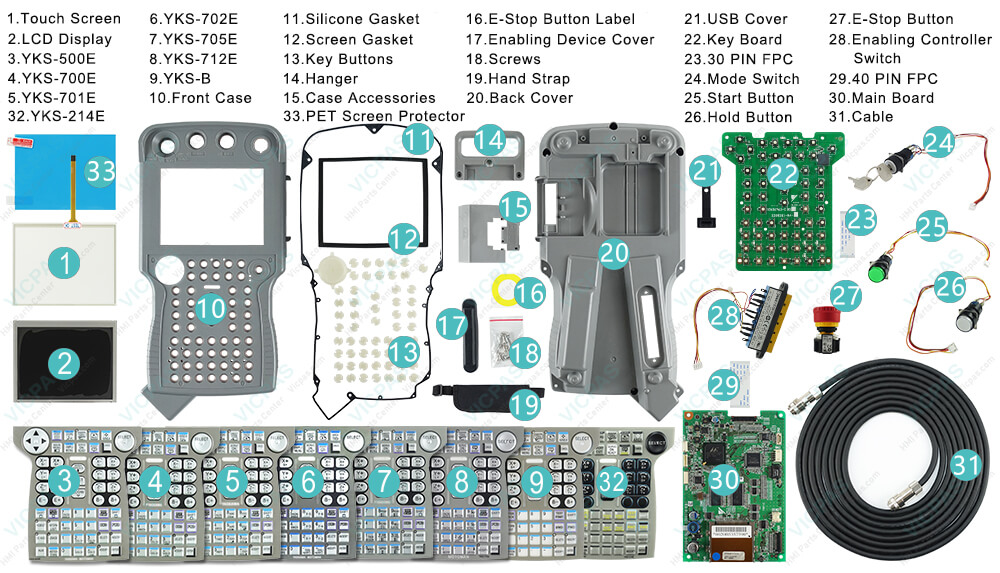
The JZRCR-APP01-1 is one of the common teach pendant configurations for the Yaskawa YRC1000 robot, used for program editing, manual operation, alarm viewing, I/O monitoring, and operation mode management. After long-term frequent operation, oil contamination ingress, accidental drops, or repeated cable bending, issues such as unresponsive keys, inability to switch modes, abnormal display, and communication interruption may occur.
On-site Judgment Conclusion: When some keys are unresponsive, typically first check the keypad membrane, key contact surfaces, and ribbon cables; when modes cannot be switched, focus on checking the mode switch and its connecting cables; when the teach pendant is completely black-screened or repeatedly restarts, it is necessary to check the control cabinet power supply, teach pendant cable, connectors, and internal mainboard.
1. Confirm the Teach Pendant Complete Model
Before repair, verify the teach pendant's back label, complete model number, and hardware version to confirm it is JZRCR-APP01-1. Different YRC1000 teach pendants may use different keypad membranes, display components, switch harnesses, and mainboards. Parts with similar appearances may not be directly interchangeable.
2. Common Fault Manifestations
Common phenomena include some keys not responding, a single press generating multiple inputs, keys triggering automatically, mode switch not being recognized, black or white screen, screen flickering, teach pendant repeatedly restarting, and sudden communication interruption when moving the cable. Faults should be categorized as keypad, display, communication, or safety circuit issues based on specific manifestations.
3. Record Fault Occurrence Conditions
Before inspection, record the faulty keys, current operation mode, complete alarm information, and teach pendant screen display. Confirm whether the problem is persistent or intermittent. Also record whether the fault is related to control cabinet temperature, teach pendant drop, cleaning liquid ingress, or cable position. This information helps narrow the inspection scope.
4. Manifestations of Keypad Membrane Damage
After the keypad membrane wears out, issues may include fixed area failure, requiring forceful pressing, poor key rebound, or worn characters. If oil or moisture enters inside the keypad membrane, it may also cause key sticking or automatic triggering. If the fault is consistently concentrated in the same key area, prioritize checking the keypad membrane and corresponding contact circuits.
5. Inspect Keypad Membrane and Contact Surface
During disassembly inspection, observe whether the keypad membrane is cracked, bulging, deformed, or soaked with oil. Simultaneously check if the key contact surfaces and connecting ribbon cables are oxidized, loose, or pinched. Cleaning only the external surface cannot resolve contamination that has already entered internally. Severe liquid ingress or conductive circuit wear requires replacing with a matching keypad membrane.
6. How to Select Keypad Membrane Model
The JZRCR-APP01-1 may be paired with different versions of keypad membranes and panel components, such as AKS series parts. Before replacement, verify the key layout, ribbon cable interface, positioning holes, and original part number. Do not purchase based solely on teach pendant appearance. Installing an incorrect version may cause some key positions to not correspond or complete input failure.
7. Mode Switch Fault Manifestations
After the mode switch or its connecting cable becomes abnormal, the controller may fail to correctly identify the teach, playback, or remote operation states, or mode states may change repeatedly. The switch being mechanically rotatable does not mean the electrical contacts are normal. Check whether the state in different positions can be stably transmitted to the control system.
8. Inspect Mode Switch Connecting Cable
Check if the mode switch harness is loose, pinched, broken, or pulled. Observe the plug locks and terminals for integrity. After the teach pendant has been dropped or repaired, the switch harness may become loose from the connector. When the fault changes with pressing the housing or moving the harness, focus on inspecting connectors and solder joints.
9. How to Judge Teach Pendant Black Screen
When the teach pendant is completely black-screened, first confirm whether the YRC1000 control cabinet has completed startup. If the control cabinet is normal but the teach pendant has no display, check the teach pendant power supply, cable, and connectors; if the screen has a faint glow but no normal image, it may be related to the backlight, LCD component, internal ribbon cable, or mainboard display circuit.
10. How to Troubleshoot Communication Interruption
When the teach pendant can power on but stays on the startup screen, operation is significantly delayed, or it repeatedly disconnects, check the control cabinet interface, teach pendant cable, and internal communication circuit. Internal cable conductors may break after long-term bending, causing the teach pendant to connect normally only in specific positions.
11. Check Emergency Stop and Enable Switch
The teach pendant emergency stop button and three-position enable switch are part of the robot safety chain. Abnormalities in the emergency stop contacts, enable switch, or safety circuit lines in the cable may prevent servo startup. After repair, it is essential to confirm the emergency stop button can trigger and release normally, and the enable switch states in different press positions are also correct.
12. Inspect Housing and Internal Ribbon Cables
After the teach pendant is dropped, the housing may deform and continuously press against the keypad membrane, display screen, or internal circuit boards. During disassembly inspection, observe whether fixing posts, screw positions, ribbon cable locks, and connectors are damaged. Improperly installed ribbon cables may cause intermittent failure of screen, key, or switch functions.
13. Inspect Internal Circuit Boards
After confirming the keypad membrane, mode switch, cables, and connectors are normal, proceed to check the internal circuit boards. Focus on observing signs of liquid ingress corrosion, burn marks, component cracks, connector cold solder joints, and power circuit abnormalities. Oil mixed with metal dust may form conductive contamination, causing multiple functions to malfunction simultaneously.
14. Replacement Test Precautions
Before using a known-good teach pendant for replacement testing, confirm the model, interface, and system configuration match. If the fault disappears after replacing the teach pendant, the problem is usually concentrated in the original teach pendant or its cable; if the fault remains unchanged, continue checking the YRC1000 control cabinet interface, power supply, and system status.
15. Functional Verification After Repair
After teach pendant repair is complete, test each physical key, display screen, mode switch, emergency stop button, and three-position enable switch individually. Confirm that moving the cable within the normal range does not cause black screen, restart, or communication interruption. After mode switching, the operation state displayed by the controller should match the switch position.
16. Robot Recommissioning Test
After confirming teach pendant operation and safety functions are normal, test each robot axis movement in manual low-speed mode, then run a complete program at low speed. Subsequently, check automatic mode, peripheral start signals, and safety door interlocks, confirming that mode switching, program startup, and robot stopping processes are all normal.
17. Summary
When the Yaskawa YRC1000 robot JZRCR-APP01-1 teach pendant experiences faults, judgment should be made separately based on keypad, mode switch, display, communication, and safety circuits. Fixed-area key failure should focus on checking the keypad membrane; mode recognition failure should check the switch and harness; black screen or disconnection requires checking power supply, cables, connectors, and internal mainboard. After repair completion, all operation and safety functions must be verified.
Repair Consultation
If you need to handle Yaskawa YRC1000 robot JZRCR-APP01-1 teach pendant key unresponsiveness, inability to switch modes, black screen, or communication interruption, please provide front and back photos of the teach pendant, complete model number, controller model, fault screen display, and cable condition photos.
Industrial Robot Repair Hotline: +86 18122009539
Contact Repair Engineer: +86 18122009539