
How Often Should Industrial Robot Lubricating Oil Be Replaced? Gearbox Oil Change Intervals and Oil Condition Assessment Methods
There is no unified replacement interval for industrial robot lubricating oil and grease. It should be determined based on the robot model, joint position, cumulative operating hours, workload, and on-site environment. This article introduces robot gearbox lubrication intervals, abnormal oil condition assessment, maintenance methods under different operating conditions, and the recommissioning inspection process after an oil change.
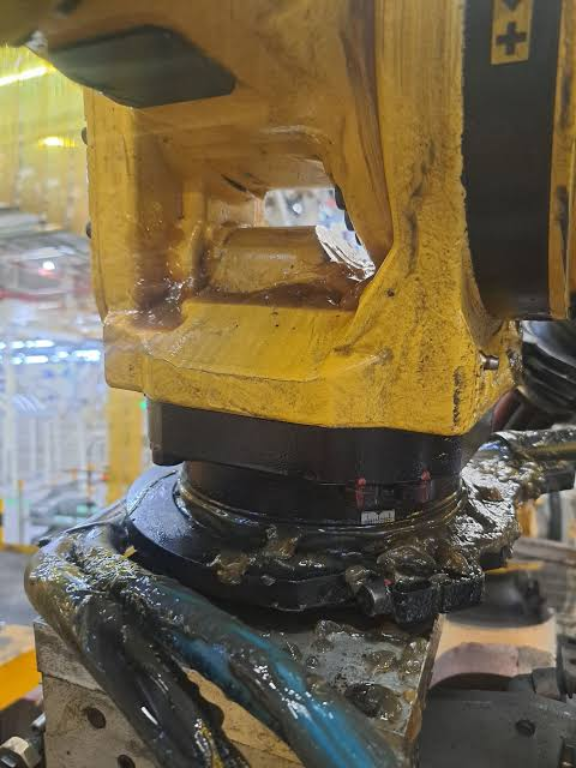
Industrial robot gearboxes endure frequent starts, stops, acceleration, deceleration, and direction changes over the long term. Internal gears, bearings, and seals rely on lubricating oil or grease to reduce wear and temperature rise. After lubricants age, become contaminated, or are insufficient in quantity, the robot may exhibit abnormal joint noise, increased temperature, operational vibration, oil leakage, and decreased positioning accuracy.
On-site Assessment Conclusion: There is no unified replacement interval for robot lubricating oil applicable to all brands and models. It should be performed according to the operating hours or calendar time specified in the corresponding robot product manual, whichever condition is met first. If the oil has emulsified, changed color, contains metal particles, or if the gearbox has been disassembled and repaired, it should be addressed promptly even if the specified interval has not been reached.
Why Oil Change Intervals Differ Between Robots
The load capacity, gearbox structure, lubrication method, and seal design of robots differ, leading to corresponding differences in lubrication intervals. Even for robots from ABB, KUKA, FANUC, and Yaskawa with similar rated loads, the lubricants used for different models and different joints may vary. Therefore, oil change timing cannot be determined solely based on robot brand or equipment size; the complete body model and specific axis number must be verified.
Calculating Based on Operating Hours or Service Life?
Robot lubrication intervals typically consider both cumulative operating hours and calendar time. Robots in continuous three-shift production may quickly reach the specified operating hours, while robots with long-term downtime or infrequent use, despite having fewer operating hours, will also experience gradual lubricant aging due to oxidation, moisture absorption, and temperature changes. When planning, follow the equipment manual's specifications, using whichever condition (operating hours or calendar period) is met first.
Is an Oil Change Mandatory at 10,000 Operating Hours?
After a robot operates for 10,000 hours, the gearbox lubrication condition should be inspected as a priority, but this does not mean all robots must uniformly change oil at 10,000 hours. Some models may be nearing their specified maintenance interval, while others may only require checking oil level, color, and seal condition. The decision to replace should be based on a combination of robot model, maintenance history, oil condition, joint temperature rise, and operating sound.
What's the Difference Between Lubricating Oil and Grease?
Some robot gearboxes use gear oil, some joints use grease, and some robots use different lubrication methods for different axes. Lubricating oil generally has better flow and heat dissipation capabilities, while grease is more easily retained on gear and bearing surfaces. The two cannot be substituted for each other, nor should they be mixed based on similar color or viscosity, as this may lead to reduced lubrication performance, seal failure, and increased gearbox temperature rise.
Which Operating Conditions Require Shortened Inspection Intervals?
When robots operate at high speeds for extended periods, experience frequent emergency stops, operate near rated load limits, are installed in high-temperature environments, or handle high-impact processes like stamping loading/unloading, the aging rate of lubricants may accelerate. Environments with welding fumes, spray oil mist, metal dust, humidity, and significant temperature fluctuations also increase the risk of seal aging and lubricant contamination. Equipment in such conditions should have shortened inspection intervals and increased recording of oil condition.
How to Determine if Lubricating Oil Has Aged
Normal oil should remain relatively uniform, without obvious stratification, emulsification, coking, or a large amount of impurities. If the drained oil has significantly darkened in color, has abnormal viscosity, carries a pungent burnt smell, shows foam, or contains visible metal particles, it indicates the oil may have aged or there is abnormal internal wear in the gearbox. When assessing, it's best to compare with new oil of the same model or historical oil samples; conclusions should not be based solely on color.
What Do Metal Particles Indicate?
The significance of a small amount of fine wear debris differs from that of a large amount of visible metal chips. If obvious shiny flakes, iron filings, or particles appear in the lubricating oil, accompanied by abnormal joint noise, temperature rise, and mechanical backlash, the gearbox gears, bearings, and internal transmission components should be inspected as a priority. Simply replacing the lubricating oil may temporarily reduce noise but cannot resolve existing mechanical damage.
How to Assess Robot Oil Leaks
When oil stains appear on a robot joint surface, first clean the contaminated area, then observe the specific leakage location. Common causes include seal aging, poor sealing at the fill or drain ports, abnormal internal pressure in the gearbox, overfilling of lubricant, and joint housing damage. If oil droplets quickly reappear after cleaning, or if the oil level continuously drops, further inspection of the seal structure and gearbox condition is required.
What Impact Does Overfilling Have?
More lubricating oil or grease is not necessarily better. Overfilling may increase internal pressure in the gearbox, leading to leaks at seal locations, while also increasing gear churning resistance and operating temperature rise. Underfilling can cause poor lubrication of gears and bearings. During oil changes, follow the specified quantity for the corresponding axis and confirm the robot is in the posture required by the manual for draining and filling.
What Information Needs Confirmation Before an Oil Change?
Before starting the operation, confirm the robot's complete model, serial number, controller model, axis number requiring maintenance, lubricant name, specified quantity, fill and drain port locations, and the required axis posture for the robot. Simultaneously, back up programs and system data, record the current zero position, alarms, joint temperatures, and operating sounds to provide a basis for comparative inspection after the oil change.
Correct Oil Change Procedure
During an oil change, first move the robot to the specified posture to allow the old oil to drain fully, then open the drain and fill ports according to equipment requirements. After draining the old oil, check its color, odor, moisture content, and metal impurities. Then replace the seals or sealing materials and add the correct new oil in the specified quantity. After completion, clean the joint surface to facilitate subsequent observation for continued leakage.
Are Lubricants from Different Brands Interchangeable?
Different robot brands and models may have different requirements for lubricant base oil, viscosity, additives, and compatibility. Even if two lubricant products appear similar, they cannot be directly assumed to be interchangeable. Before using a substitute lubricant, confirm the corresponding equipment documentation and compatibility requirements to avoid issues like stratification, hardening, or reduced lubrication performance if different lubricants are mixed.
Why Does Abnormal Noise Persist After an Oil Change?
If abnormal noise persists after replacing the lubricating oil, it may indicate the issue is not simply oil aging. Further inspection of gearbox gear wear, bearing damage, mechanical backlash, brakes, motor bearings, and tool load may be needed. If the noise only occurs during direction reversal, high speed, or specific postures, record the corresponding axis number, speed, load, and movement direction to further narrow down the fault scope.
Recommissioning Inspection After an Oil Change
After completing the oil change, first test the forward and reverse motion of the corresponding axis at low speed, observing sound, vibration, temperature rise, and seal condition. Subsequently, run a complete program without load and gradually increase speed to confirm the robot's trajectory is normal when passing near fixtures and workpieces. After completing load testing, recheck the fill port, drain port, and joint seal locations for any seepage.
Establishing Lubrication Maintenance Records
Lubrication records should include robot model, axis number, cumulative operating hours, oil change date, lubricant name, actual quantity used, condition of drained oil, and operator. When emulsification, metal particles, oil leaks, or abnormal temperature rise are found, save photos and oil sample records to facilitate assessment of change trends during the next maintenance.
Summary
How often robot lubricating oil should be replaced should be determined based on the maintenance manual for the corresponding model, cumulative operating hours, calendar time, and actual operating conditions. The same interval cannot be set for all brands. When the specified interval is reached, the oil shows obvious aging, the gearbox has been disassembled and repaired, or contamination occurs, it should be replaced promptly and the internal mechanical condition inspected.
An oil change is not simply draining old oil and adding new oil. It also requires confirming the axis number, oil specification, fill quantity, robot posture, and seal condition. After completing maintenance, verify the robot's sound, temperature rise, positioning, and leakage through low-speed, no-load, and load-bearing operation.
Repair Consultation
If you need assistance with industrial robot lubricating oil replacement, joint oil leaks, gearbox abnormal noise, or abnormal temperature rise, please provide the robot brand, body model, faulty axis number, cumulative operating hours, on-site oil photos, and operating videos.
Industrial Robot Repair Hotline: +86 18122009539
Contact Repair Engineer: +86 18122009539